
Advanced Garmin Triggers
Creating a trigger and assigning it to a participant
What Advanced Garmin Triggers do
Advanced Garmin Triggers let you deliver a survey or a message to a participant (or to their Support Team) the moment their Garmin data meets a condition you define — for example, when stress stays above a set level, or when heart rate drops below a threshold.
They are more flexible than Garmin Intervention Triggers, which fire against a percentile of the participant’s own previously-collected data. The key difference:
| Garmin Intervention Triggers | Advanced Garmin Triggers |
Threshold type | Percentile of the participant’s own collected data | Absolute value, or a percentage of the participant’s baseline |
Conditions per trigger | One | Multiple, combined with and / or |
Best for | Thresholds that adapt to each individual automatically | Study-wide thresholds, or multi-condition logic |
How the setup works
Setting up an Advanced Garmin Trigger takes place across two pages, in three stages. You build the trigger once, then enable and assign it for each participant.
Stage | Where | What you do |
1. Build | Advanced Triggers page | Define the condition(s) that make the trigger fire. Done once — the trigger can then be reused for any participant. |
2. Enable | Advanced Configurations → Trigger Params tab | Turn Garmin triggers on for the participant and set the limits that apply to all of their triggers (daily cap, active hours, cooldown). |
3. Assign | Advanced Configurations → Triggers tab | Attach the trigger to the participant and choose what it delivers — a survey, a message, or both — and who receives it. |
Before you start
Have these ready, or the trigger will be created but nothing will reach the participant:
- The participant’s Garmin device is paired and reporting data.
- Any survey you want the trigger to deliver is already built and assigned to the participant as OnDemand. Garmin-triggered surveys use the same availability window as OnDemand scheduled surveys.
- If you want to send an informational message, the Messages config is enabled for the participant.
Stage 1 — Build the trigger
Go to the Advanced Triggers page.
- Click Add to create a new trigger. A pop-up appears asking for a name. Enter a name and click OK.
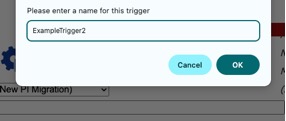
Naming a new trigger
- The new trigger appears on screen with default values, ready to edit.
- To edit a trigger you created earlier instead, choose it from the Select drop-down.
- Choose the Garmin data type from the first drop-down. See Data types below for what the options mean.
- Choose the comparison operator from the second drop-down.
- Enter the value the data is compared against.
- Set the logical operator at the end of the line to none if this is the whole trigger. (To add more conditions, see Stage 1b.)
- Click Save.
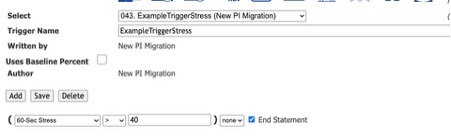
A simple trigger: fires when the 60-second stress average is greater than 40
Data types
Continuous data types are averaged over a sample period — 60 seconds, 5 minutes, or 10 minutes. The period is part of the drop-down name, so 60-Sec Stress means “the average stress over the last 60 seconds” and 5-Min Heart Rate means “the average heart rate over the last 5 minutes.”
Cumulative data types are running totals rather than averages — Steps is the clearest example.
Comparison operators
Operator | Meaning | Fires when… |
> | Greater than | The value is above your threshold |
< | Less than | The value is below your threshold |
≥ | Greater than or equal to | The value reaches or exceeds your threshold |
≤ | Less than or equal to | The value reaches or falls below your threshold |
= | Equal to | The value matches your threshold exactly |
!= | Not equal to | The value is anything other than your threshold |
Absolute value or percentage of baseline
By default the value you enter is an absolute one. Tick Uses Baseline Percent to treat it as a percentage of the participant’s baseline instead — so a value of 120 would mean “120% of this participant’s baseline.”
Note: This checkbox is a property of the trigger itself, set here. On the participant’s Triggers tab the Use % of Baseline column is read-only — it only reports what you chose here. If you tick it, also enable Use Baseline in Trigger Params (Stage 2). |
Stage 1b — Combine conditions
A trigger can test more than one condition. Conditions are grouped into statements, and statements are joined to each other — both using the same two controls.
Control | What it does |
Logical operator (end of each line) | Joins this line to the next one:
|
End Statement checkbox | Closes the current group — it is the closing bracket.
|
Worked example
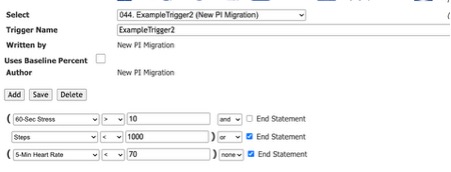
Three conditions in two groups
Reading the screenshot line by line:
- 60-Sec Stress > 10 — operator and, End Statement unchecked, so the group stays open and the next line joins it.
- Steps < 1000 — End Statement checked, closing the first group. Its operator, or, joins that group to the next one.
- 5-Min Heart Rate < 70 — a group of its own, closed with End Statement and ended with none.
Which reads as:
IF ( 60 seconds of stress greater than 10 AND fewer than 1000 steps ) OR ( average heart rate below 70 over 5 minutes ) → trigger |
Stage 2 — Enable Garmin triggers for the participant
Open the Advanced Configurations page for the participant and go to the Trigger Params tab.
- Tick Enabled. Garmin triggers do nothing for this participant until this is on.
- Set the parameters below.
- Click Save Changes.
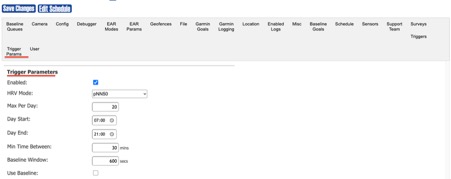
The Trigger Params tab
Setting | What it controls |
HRV Mode | How HRV data is measured — pNN50 or average standard deviation. |
Max Per Day | The maximum number of triggers the participant can receive in one day. |
Day Start / Day End | The window during the day when triggers are allowed to fire. |
Min Time Between | The cooldown between triggers. A trigger cannot fire more than once in this many minutes. |
Baseline Window | How many seconds of baseline data are used for comparison. |
Use Baseline | Compares against the baseline rather than an absolute value. Tick this if the trigger uses Baseline Percent. |
Baseline Queue Lengths
If you are using baseline comparison, scroll down from Trigger Params to Baseline Queue Lengths. Each queue is a sliding window of N seconds over one data type — set how much history each baseline is calculated from.
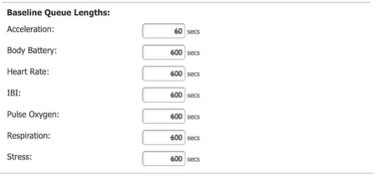
Baseline queue lengths, one per data type
Stage 3 — Assign the trigger to the participant
Still in Configurations, go to the Triggers tab. This is where you attach a trigger you built in Stage 1 and decide what it delivers and to whom.
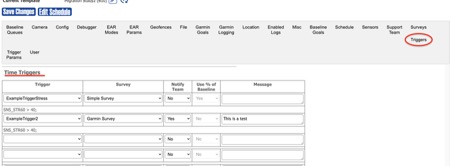
The Triggers tab — each row assigns one trigger
Fill in one row per trigger:
Column | What to enter |
Trigger | The trigger you created on the Advanced Triggers page. Its condition is shown as text below the row so you can confirm you picked the right one. |
Survey | The survey to deliver when the trigger fires. Leave empty if you only want to send a message. |
Notify Team | No — the participant receives the survey or message. Yes — the Support Team members receive it instead. |
Use % of Baseline | Read-only. Shows whether the trigger uses baseline or absolute values, based on the Uses Baseline Percent setting on the Advanced Triggers page. |
Message | An informational message shown to whoever receives the trigger. Requires the Messages config to be enabled. |
Important: If the trigger delivers a survey, that survey must already be assigned to the participant as OnDemand. Garmin-triggered surveys use the same availability window as OnDemand scheduled surveys — if the survey is not assigned, the trigger will fire but the participant will see nothing. |
Final check
Before you finish, confirm:
- The trigger is saved on the Advanced Triggers page and every line ends correctly (the last one set to none).
- Enabled is ticked in Trigger Params for this participant.
- Max Per Day, Day Start / Day End and Min Time Between will actually let the trigger fire when you expect it to.
- The trigger is listed on the Triggers tab with the right Survey, Notify Team and Message.
- Any attached survey is assigned to the participant as OnDemand.
- If you are sending a message, the Messages config is enabled.
- You clicked Save Changes on the configuration page.