mEMA-10 Feature Changes
Researcher Guide
A walkthrough of upcoming changes on the mEMA-10 platform and how to use the new features.
1. View Study List
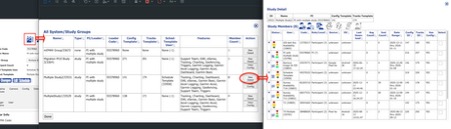
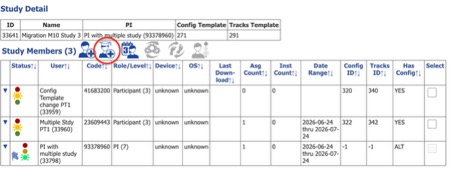
Available on every mEMA-10 page and on the My mEMA page, via the toolbar icon shown below.
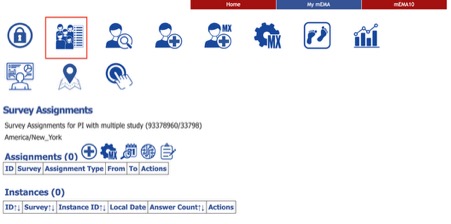
Opens a popup listing all system groups and studies you belong to, with columns for name, type, who the PI or leader is, whether a configuration template exists, whether a tracker template exists, who the schedule template user is, what features are enabled, and how many members are in each group.
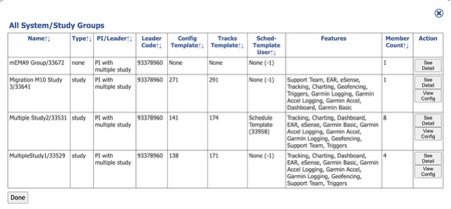
From the list you can open a study’s full detail view (“See Detail”) or jump directly into the configuration page for that study’s template user (“View Config”).
For PIs and Professional accounts managing multiple studies, this can be the primary way to navigate between them without having to type mobile codes manually.

2. Unified Navigation Toolbar
Every mEMA-10 page (Configuration, Tracker, Dashboard, Geofence, Groups, etc.) now has the same set of toolbar buttons.
The unified bar shows, in order: page-specific controls (e.g. the group picker on the Geofence page), the mobile code lookup, View Study List, People Finder, Add Participant, then all feature navigation buttons (Configuration, Tracker, Charts, Dashboard, Geofences, Advanced Triggers). Feature buttons only appear if your account has permission for that feature. My Home always appears at the end.
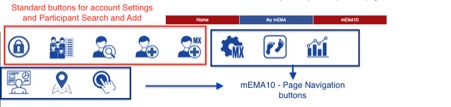
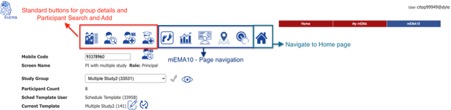
Button Legend
 Change your password
 View Study List
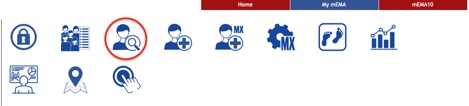
 People Finder
 mEMA9 Account/Participant Creation
 mEMA10 Account/Participant Creation
 Move Participant to Study
 Navigate to mEMA10 Configuration page
 Navigate to mEMA10 Tracker page
 Navigate to mEMA10 Garmin Charts page
 Navigate to mEMA10 Dashboard page
 Navigate to mEMA10 Geofence Group page
 Navigate to mEMA10 Advanced Triggers page
 Navigate to My mEMA home page
3. Schedule Templates — Full Workflow
Previously, surveys could be assigned to groups directly. That approach has been replaced with a schedule template system, where one designated account holds the “master” schedule and copies are pushed out to participants.
Setting up the template user
From the study detail (see the Study Detail View section below), one participant is designated as the Schedule Template User for the study. That account gets a special clock/calendar icon in the member list. This is done through the group management interface — if no template user is set, the Apply Schedule Template button in the header is grayed out.

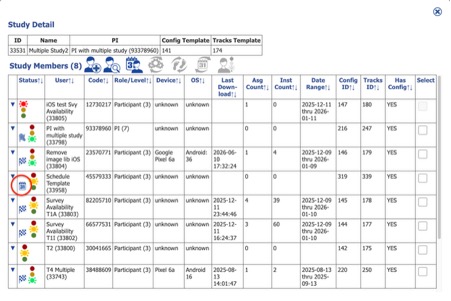
Once a Schedule Template User is set, you can distinguish that user on the Study Detail view by the calendar icon next to the status (semaphore) icon.
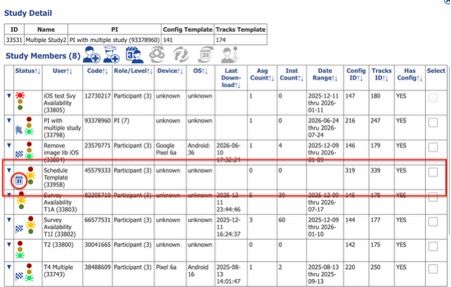
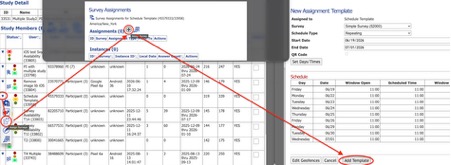
Building the schedule
Open the Schedule Template User’s configuration page, then click the Edit Schedule button (calendar icon in the bottom toolbar). This opens the schedule management dialog, where you add assessment assignments — choosing the survey, date range, timing type (interval, random, event-based, or fixed dates), and the rest of the schedule parameters.
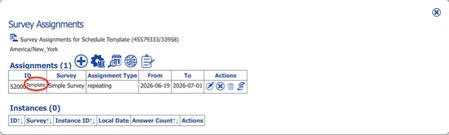
Once the assignment is created, you can see on the Assignments list that it’s the template by the “Template” tag.
Assigning to participants
From the study detail, check the boxes next to the participants you want to schedule, then click Apply Schedule Template in the header.
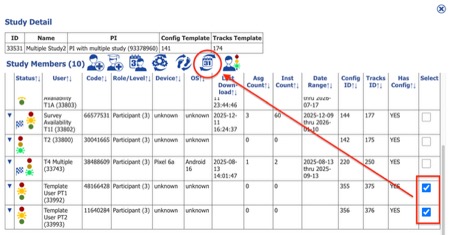
A dialog appears asking how the schedule should start:
- Auto (Next Week) — the default. The system calculates the next Monday and starts from there, proportionally shifting all the template dates.
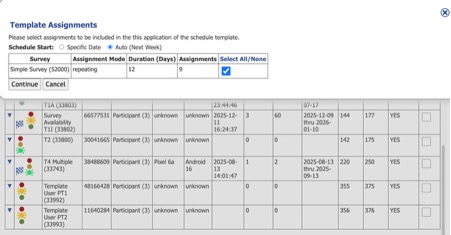
- Specific Date — pick any start date manually.
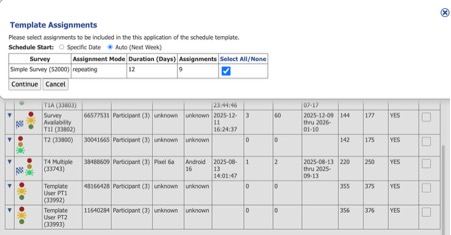
The system then generates individual assignment copies for each selected participant, with all dates shifted relative to their start date.
Managing existing assignments
When you open a participant’s schedule dialog (via Edit Schedule in their row), you see their assignments. Each one shows which template it came from, if any.
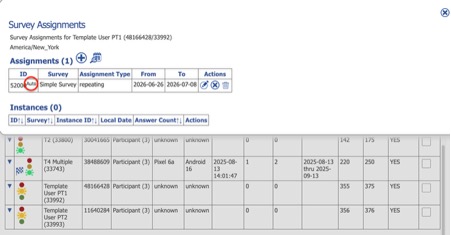
You can also apply the schedule template directly from the Template User’s Survey Assignments view. For any template assignment, click the Apply Template button in the Actions column, then select which user(s) you want to apply the schedule template to.
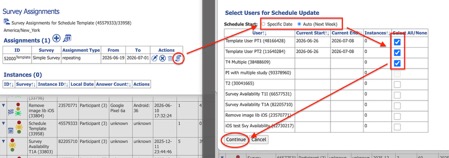
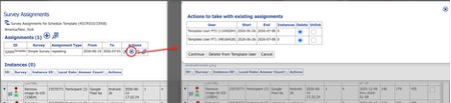
To remove assignments from the template user, you have three options:
- Delete selected participant assignments outright — removes their schedule but keeps the template and other participants intact.
- Unlink selected participants — keeps their existing schedule dates but breaks the connection to the template, so future template updates won’t affect them.
- Delete from Template User — a new option that deletes the template assignment itself and automatically unlinks all participants from it in one step.
4. Study Detail View
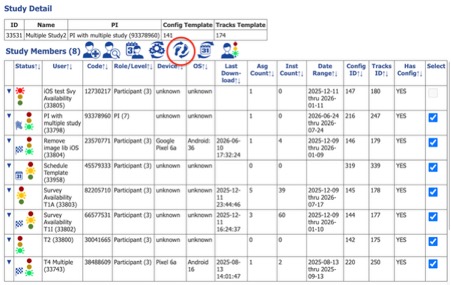
Opened from “See Detail” in the Study List…
… or by tapping the Show Participants button from the mEMA10 Configuration page.
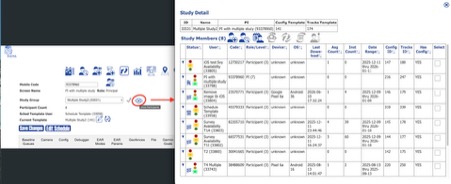
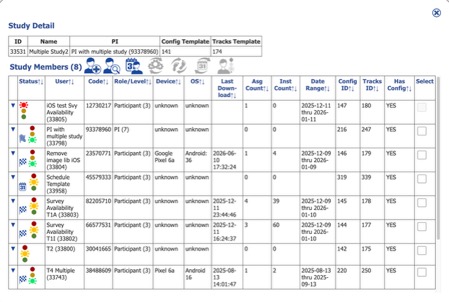
Shows a full table of everyone in the study, with the columns described below.
Status icons (first column)
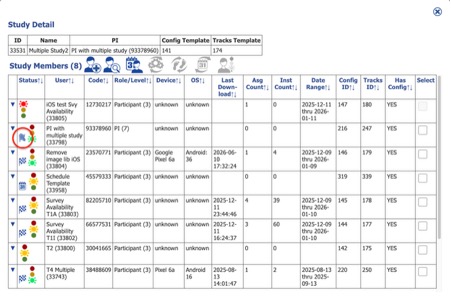
- Flag icon — Team Leader / PI
- Clock/calendar icon — this person is the Schedule Template User
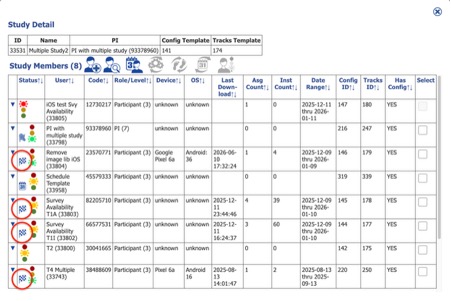
- Checkered flag icon — this person has completed their full assessment schedule
- Colored dot — account status: green = Active, yellow = Pending, red = Suspended
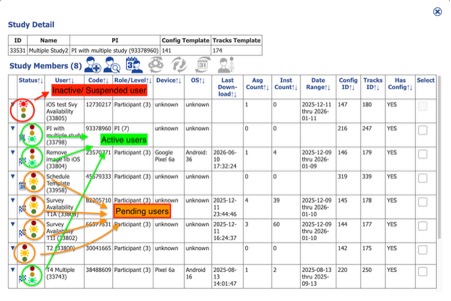
- When a new account is created, it’s always set to Pending.
- Suspended status can currently only be set by Staff accounts.
- Marking an account as Active is done by selecting the checkbox next to the user, then clicking Initialize/Activate User. This lets researchers track internally which accounts have started their study and which haven’t. In addition to changing the status icon, the Initialize/Activate User button also acts as the Apply Configuration button.
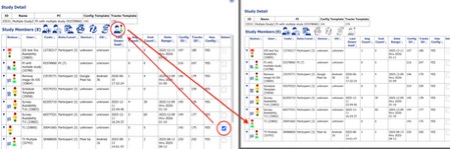
Other columns
- User — participant screen name
- Code — their 8-digit mobile code
- Role — Participant, Professional, PI, or Staff, plus numeric level
- Device — phone model they last used
- OS — operating system version
- For iOS this is currently not showing the device model, but it will be enhanced in the future.
- Last Download — last sync date
- Assignments — number of survey assignments
- Instances — total number of individual assessment prompts scheduled
- Date Range — span of their assessment period (start through end)
- Config ID — mEMA internal configuration tracking ID
- Tracks ID — mEMA internal track template ID
- Has Config — YES (they have their own config), ALT (config from a different study), or NO
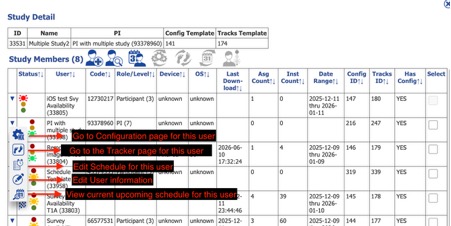
Per-user action dropdown (▼ button)
Depending on your role, each row has a dropdown with:
- Go to Configuration page for that user (if the user is in a Study group)
- Open Tracker page
- Edit mEMA-9 Config (if the user is in a mEMA9 system group)
- Edit Schedule (assign/edit surveys)
- Edit Info
- View Current Schedule
Header action buttons
Above the table:
- Create new mEMA10 Study User/Participant
- Move existing user into current group
- Apply Config Template
- Apply Tracker Template
- Apply Schedule Template
- Initialize/Activate User
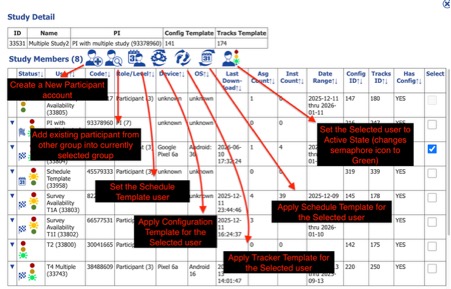
These operate on whichever rows you have checked. You can select multiple users at once — click a checkbox, hold Shift, then click another checkbox to select every user in between the two selections.
The table can be sorted by any column by clicking its header.
Changing Group/ Study Name
As a PI or Professional account member of a group or Study, you can now rename a Study or Group at any time from the Study Detail view. Simply update the name and click Make Change to save. If the new name doesn't appear right away, refresh the page to see the update.

5. Switching Active Study Group
For PIs and Professionals with multiple studies.
Open the Study List from any mEMA-10 page. Click View Config next to the study you want to work in — this jumps directly into the configuration template for that study. From there you can use People Finder or the code input to navigate between participants within that study.
If a participant is in multiple study groups, you can switch which template applies to them by selecting the study group from the dropdown, then clicking the checkmark icon. After that, click Apply Template.
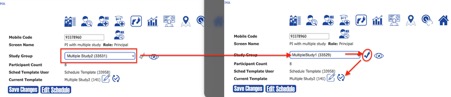
Participants also have a study group shown on their Tracker page. If a participant needs to be moved from one study to another, see Move User to Study below — the Tracker page reflects the new group immediately after a change.
6. Edit Schedule Button (Configuration Page)
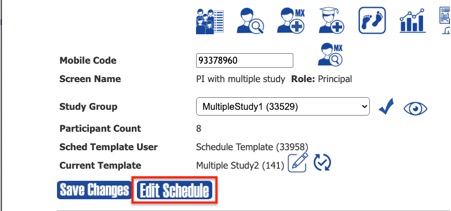
When viewing a participant in the Configuration page, the button labeled “Assign Surveys” has been renamed to Edit Schedule. The functionality is the same — the change is visual only. Clicking it opens the full schedule management dialog for that participant, directly from within the config view.
7. Edit Configuration Template — What Changed
Opening the template
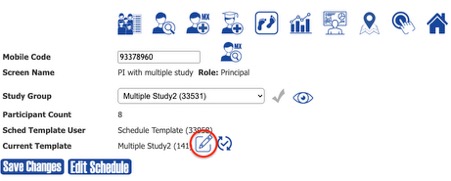
From the Configuration page, the Edit button (pencil icon next to the template reference label) loads the template into the editor. This was previously called “Load Template.”
Apply Changes (Apply Config Template)
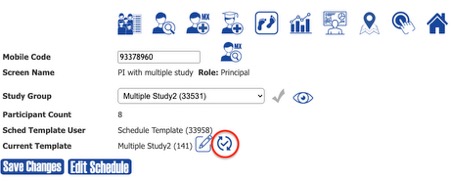
From the Configuration page, the Apply Template button has moved next to the Edit Template button.
What’s new
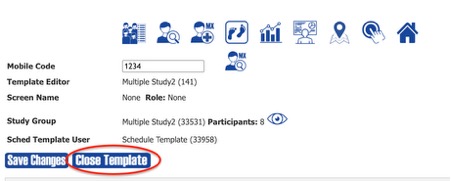
When the template is open, the bottom toolbar now shows Close Template instead of the Assign Surveys button, since templates don’t have a personal schedule. See below.
8. Close Template Button
When you open a Configuration template or a Tracker template for editing, you’re now viewing the template user’s data instead of a real participant. Previously, the only way to get back to your participant was to type in their mobile code or find them manually.
Now there’s a Close Template button in the bottom toolbar whenever you’re in template-editing mode. Clicking it returns you to your own account.
This works on both the Configuration page and the Tracker page.
9. Tracker Template — Separate from Configuration Template
The Tracker feature (activity monitoring specs — what sensors to capture, sampling rates, etc.) now has its own independent template system, separate from the Configuration template.
In the Tracker page, when viewing a participant who belongs to a study with a tracker template set up, you’ll see a Current Template row showing which template their tracker is based on. Two buttons appear next to it:
- Edit Template — opens the template itself for editing (the Close Template button appears so you can return).
- Apply Tracks Template — immediately pushes the study’s current tracker template to this one participant, overwriting their individual tracker spec.
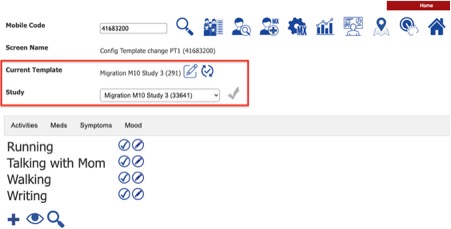
From the study detail, the Apply Tracker Template button in the header does the same thing, but for all selected participants at once.
The Tracker template and the Configuration template are managed independently — applying one does not affect the other.
10. Move User to Study
From the Configuration page toolbar, when you have a participant loaded, an Move User to Study button is now available (person-plus icon). This opens the People Finder and lets you search for an existing account.
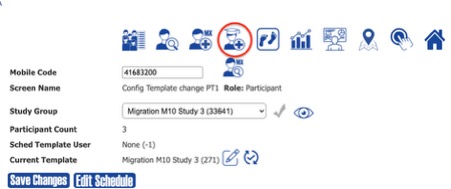
When you select someone, the system moves them into the current study group. If they were already in a different study group, they’re transferred:
- Their tracker spec follows them to the new group (or is replaced by the new group’s spec, if one already exists for them there).
- Their configuration follows them as well.
- Caches are cleared immediately, so the change is reflected without needing to reload.
After the transfer, a prompt asks if you want to switch your view to that user’s account.
This is distinct from Add Study User/Participant (which creates a brand-new account). Move User to Study moves an existing account across studies.
From the Study Detail view, the Move Existing User/Participant button does the same thing.
11. Remove User from Study
As a PI or Professional, you can now remove participants from a study group. This feature works alongside Move User to Study and is useful when you don't want participants belonging to multiple study groups at the same time.
⚠️ Important: Removing a participant from your study will revoke your access to that participant. Always move the participant to their new study before removing them from the previous one.
Recommended order of action:
1. Move the participant into the new study.
2. Remove the participant from the previous study.
If you accidentally remove a participant before moving them to a new study, please contact customer support for assistance.
Note: Users set as Scheduled Template accounts cannot be removed from a group until their Scheduled Template status has been removed.
Steps to remove a user from a Study:
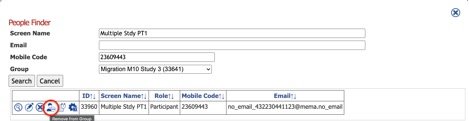
- On the Configuration or Home page, click the People Finder button.
- Search for the participant by Screen Name or Mobile Code, and use the dropdown to select the group you want to remove them from.
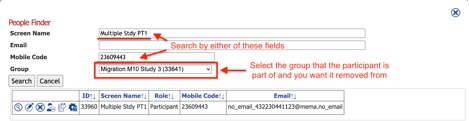
- Click Remove from Group and confirm the action when prompted.