
Schedule Template
Full Feature Walkthrough
How to build a survey schedule once and roll it out to participants — including exactly how Auto (Next Week) and Specify Date affect Scheduled, Repeat, Momentary and OnDemand assignments.
1. What the Schedule Template Feature Is
The Schedule Template system lets a researcher build a survey schedule once — on a designated “template user” — and then stamp that schedule out to any number of participants, shifting all dates forward automatically. It separates the job of designing a schedule from the job of distributing it.
Before you use this feature The behavior differs meaningfully depending on which assignment type you use: Scheduled (SCD), Repeat (RPT), or Momentary (MMT). Understanding those differences — covered in Sections 5 and 6 — is essential before applying a template to real participants. |
2. Setting Up a Template User
Every study group can have exactly one designated template user. This person’s survey assignments are treated as the master copy rather than as real participant assignments.
To set one up
- Open the Study Detail view for a study group.
- Set Sched Template User and choose a member of the group. This should be a research coordinator, staff account, or a dedicated placeholder account — not an actual participant.
- The system records that person as the group’s template user.

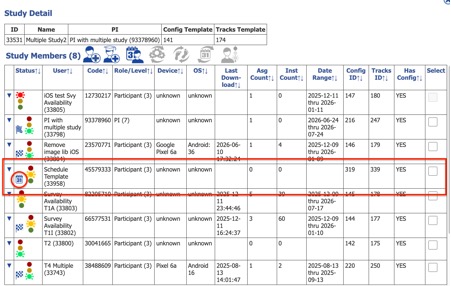
From this point on, any survey assignment given to that person is a template. The system marks those assignments internally so it knows they are source blueprints, not live participant schedules.
3. Creating Template Assignments
Go to the template user’s survey assignment page and assign surveys the same way you would for any participant. You can create multiple template assignments — one per survey, or one per survey–mode combination.
Dates on the template are just an anchor The dates you enter on the template are used only as a reference point for computing offsets when you apply — participants never receive those exact dates. The structure, duration, and prompt configuration all carry through. |
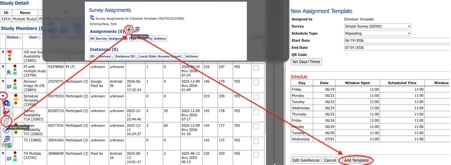
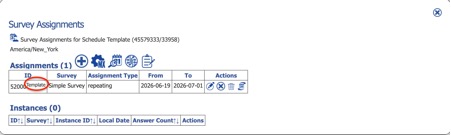
The three assignment types
They behave differently when the template is applied — this distinction drives everything in Sections 5 and 6.
- Scheduled (SCD) — you specify individual prompt windows with exact dates and times. Every window is stored as an absolute timestamp.
- Repeat (RPT) — you define a recurring day-of-week and time pattern (e.g., Monday through Friday at 10 AM and 2 PM) over a date range. The pattern is what gets reused, not the specific dates.
- Momentary (MMT) — prompt times are randomly generated within a date range and per-day count/interval constraints. There are no fixed windows — the schedule is stochastic.
4. Applying the Template to Participants
From the Study List View — Bulk
The Study List shows all members of the study group with checkboxes. This is the main path for bulk scheduling.
- Check the boxes next to every participant you want to schedule.
- Tip: after checking a participant, hold Shift and click another checkbox — every checkbox in between is automatically selected.
- Apply Sched Template.
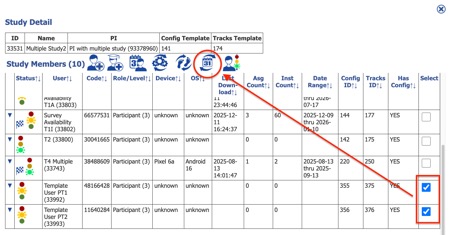
- A two-step dialog opens:
- Step 1: a table lists all of the template user’s assignments — survey, mode, duration, and prompt window count. All are pre-checked; uncheck any you want to exclude. Choose your start mode (
- Step 2: a review screen shows each selected participant with their current assignment dates and response counts. Confirm to proceed.
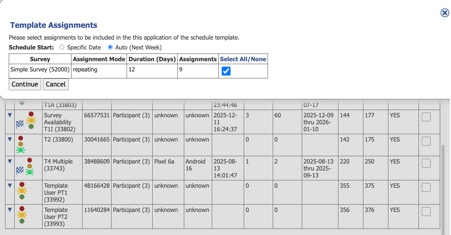
- Submit. All checked participants receive copies of the selected assignments, with dates shifted forward.
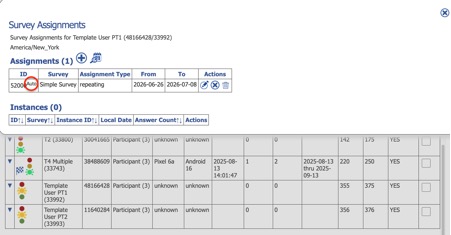
The key advantage here is scale: whether you’re scheduling 3 participants or 30, the operation takes the same number of clicks and applies everything in one server pass.
From the Template User’s Assignment Page — Per Assignment
You can also open a single template assignment from the template user’s profile. This shows a dialog to pick which participants receive that particular assignment. The date and response-count information per participant is the same, and the mechanics are identical — it’s just scoped to one template assignment at a time.
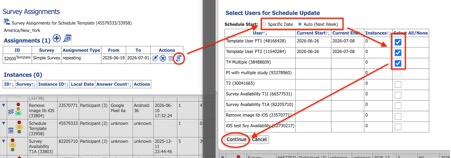
Use this path when you need fine-grained control over which participants get which specific assignment, independently of the rest of the template.
5. How the System Applies the Template
When you submit, the system:
- Identifies all selected template assignments.
- Computes a single day offset for the entire batch (see the two start modes in Section 6).
- For each selected participant and each selected assignment, creates a copy with all timestamps shifted by that offset.
- Stores, on each participant’s copy, a reference back to its source template — this link is how the system manages re-application and deletion later (see Section 7).
- If a participant already has an existing assignment from this same template, it is automatically cleared and replaced before the new one is created. Re-applying is always a clean slate for those existing linked assignments.
Important The template user is always excluded from receiving assignments, even if they appear in the participant list. |
6. Start Mode: Auto (Next Week)
This is the default. The system calculates the date offset automatically based on the week.
How it works precisely
- The system finds the earliest start date across all selected template assignments and determines which Sunday that week started on.
- It then finds the coming Sunday from today, using the timezone of the researcher who is currently applying the template (not the participants’ timezones).
- The offset in days between those two Sundays is applied uniformly to every timestamp: assignment start, assignment end, and every individual prompt window.
- The offset is always a whole number of days and always lands on a Sunday-anchored week boundary — so it’s always a multiple of 7.
What “next week” means The coming Sunday, calculated from today in the researcher’s local timezone. If today is Sunday, next week starts 7 days from now — it never starts the same day you apply. |
Auto with Scheduled (SCD) Assignments
Because the offset is a multiple of 7 days and SCD windows shift by exactly that offset, day-of-week is perfectly preserved. A Monday 9 AM window becomes a Monday 9 AM window one or more weeks later.
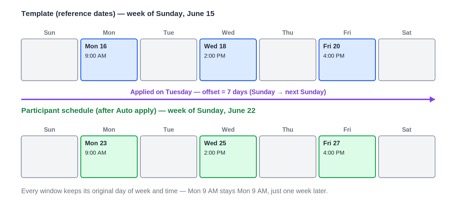
Template applied on a Tuesday — every window keeps its day and time, shifted by exactly one week.
Watch for old templates If your template’s earliest assignment starts on a date several months in the past and was never updated, Auto still computes the offset correctly — but the resulting delta might be 70+ days. Verify the computed dates before confirming, especially if the template is old. |
Auto with Repeat (RPT) Assignments
Because the offset is always a multiple of 7, the date range shifts by exactly one or more full weeks. The day-of-week pattern is re-applied to the new range, and since the range boundaries still land on the same days of the week as the original, all pattern days are generated correctly.
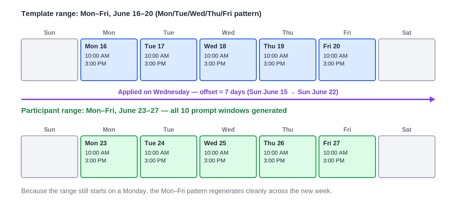
A Mon–Fri pattern applied mid-week still regenerates cleanly, because the 7-day offset preserves the range’s start day.
But this depends entirely on the template’s range actually starting on a sensible day:
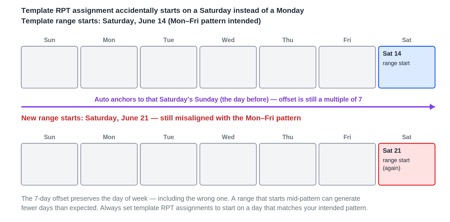
If the template range itself starts on the wrong day of week, Auto faithfully reproduces that misalignment — it does not correct it.
Rule of thumb Always set your template RPT assignments to start on a day that makes sense for your pattern (e.g., a Monday for a Mon–Fri pattern). Auto preserves whatever day-of-week the template starts on — right or wrong. |
Auto with Momentary (MMT) Assignments
The date range shifts by a multiple of 7 days, giving participants the correct week. The random prompt times are re-generated fresh for that new date range.
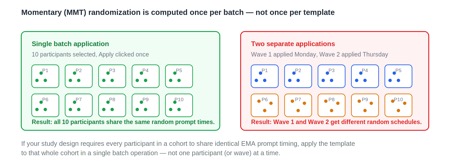
Randomization is computed once per batch application, not once per template — applying separately produces separate randomizations.
Critical behavior All participants in the same batch application receive the same randomized schedule. But if you apply the template in two separate operations (e.g., Wave 1 on Monday, Wave 2 on Thursday), those two groups will have completely different random schedules — the randomization runs fresh every time you click Apply. |
7. Start Mode: Specify Date
You enter an explicit start date. The system computes the offset as the difference in days between that date and the earliest start date across the selected template assignments. That same offset is applied uniformly to every timestamp.
What Specify Date actually shifts It shifts the range boundaries (start and end of the assignment) by the computed day delta. What happens to the prompt windows inside that range depends entirely on the assignment type — covered below. |
Specify Date with Scheduled (SCD) Assignments
Each prompt window is stored as an absolute timestamp. Every window shifts by exactly the same day delta. No windows are lost, but the day-of-week changes if your specified date doesn’t align with the template’s start day.
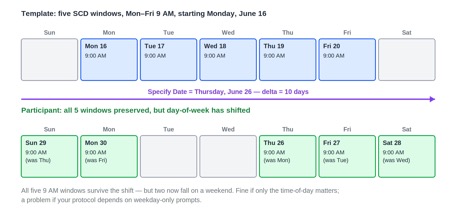
All five 9 AM windows survive a 10-day shift — but the day-of-week changes, and two windows now land on a weekend.
When this is fine: your study only requires participants to answer at the same times each day, regardless of which day of week. Day-of-week alignment doesn’t matter, and Specify Date with SCD is perfectly clean.
When this causes a problem: your SCD windows are intentionally weekdays-only and your specified date pushes some windows onto a weekend — which may not match your protocol.
Specify Date with Repeat (RPT) Assignments — the most important pitfall
The date range boundaries shift by the computed delta, and then the day-of-week pattern is re-applied against the new range. If your specified date does not align with the same day of week that the template range starts on, the pattern will not generate prompt windows for the days before it “catches up” to the first matching pattern day.
Those skipped days are not recovered They are simply skipped — the schedule is not padded or adjusted to compensate. |
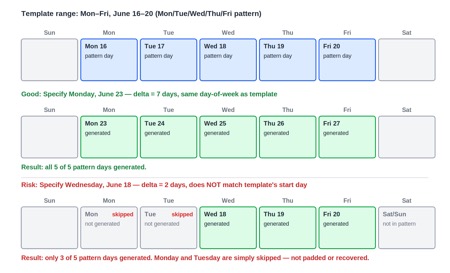
Same RPT template, two different start dates. Matching the template’s day-of-week (top) preserves all 5 pattern days. Missing it (bottom) silently drops the days before the pattern catches up.
Rule of thumb for RPT When using Specify Date, the date you enter must match the same day of the week that your template range starts on. If your template starts on a Monday, your specified date must also be a Monday. Anything else produces a truncated first week. |
Specify Date with Momentary (MMT) Assignments
The date range shifts by the computed delta, and the random prompt times are regenerated fresh within the new range — the same randomization caveats from Section 6 apply (randomization is not kept from the template; it runs fresh on every application).
The day-alignment issue from RPT does not exist here — MMT randomization fills the entire shifted date range regardless of where it starts. However, if you truncate the range by starting mid-week, participants get fewer days of prompts overall.
Good example: your MMT assignment runs 7 days and you specify a date 7 days from the template’s start. Participants get a full 7-day random schedule.
Bad example: you apply to 5 participants today, then apply again tomorrow with the same date to 2 more participants you forgot. Both applications use the same delta but run the randomization separately — the 2 late-added participants get a completely different random schedule than the original 5, even though they’re in the same study week. If within-wave consistency matters, add everyone to the same batch application.
Specify Date with Mixed Templates (SCD + RPT, SCD + MMT)
The same delta is applied to all assignments regardless of type — which creates an important interaction when a template mixes an RPT assignment with anything else.
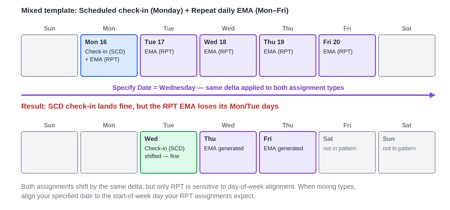
The SCD check-in shifts cleanly to its new day. The RPT EMA, shifted by the same delta, loses its Monday and Tuesday prompt days because the new start date doesn’t match the pattern’s expected day-of-week.
SCD + MMT: this combination is safer — the SCD window lands correctly, the MMT regenerates over the new range, and the two stay in sync because they share the same offset, with no day-of-week sensitivity to worry about.
8. Deleting Assignments
Removing an Assignment from a Participant
From any participant’s survey assignment view, you can remove an assignment that came from a template. The dialog shows the participant’s response count and offers two options:
- Delete — removes the participant’s assignment and all associated prompt windows entirely. The template on the template user is not affected. If you re-apply the template later, this participant starts fresh with a new assignment.
- Unlink — keeps the participant’s assignment exactly as-is but severs the link back to the template. The participant keeps their schedule and can continue responding. A future re-application of the template creates a brand-new assignment for this participant alongside the now-independent one, since there’s no longer a link for the system to clear first.
Smart default If the participant has already recorded responses, the dialog pre-selects Unlink. If there are no responses yet, it pre-selects Delete. You can override either. |
Removing a Template Assignment from the Template User
From the template user’s assignment page, you can delete a template assignment. This operation:
- Automatically unlinks all participant copies — their template reference is cleared. Participants keep their schedules and can continue completing surveys; they just no longer have any link to the template.
- Deletes the template assignment and its prompt windows from the template user.
- Saves a SQL-format backup of the deleted template to disk for recovery.
Downstream effect After this deletion, participant assignments become orphaned, independent assignments. If you later create a new template assignment for the same survey and re-apply, participants will receive a second assignment alongside their existing one — the old orphaned assignment is not automatically removed. Clean up orphaned participant assignments manually before re-applying, or unlink them from the participant side first. |
9. Additional Things Researchers Should Know
- Re-applying replaces existing linked assignments. If a participant already has an assignment linked to the current template, re-applying clears and replaces it. Responses are not affected — they live in a separate table. This is the correct way to re-schedule a participant for a new week: check their box and apply again.
- The offset uses the researcher’s timezone, not the participant’s. When using Auto, “today” and “this Sunday” are determined by the timezone of the account that clicks Apply. If your research team spans time zones, be consistent about who applies the template and when.
- Response counts are shown before you act. Both the bulk assignment dialog and the deletion dialog display the number of survey responses per participant — use this to decide between delete and unlink, and to verify a re-application won’t overwrite a participant who has already started.
- There is no automatic recurring application. The system does not re-apply the template on a schedule. If your study runs weekly for 8 weeks, you apply it manually 8 times. This is intentional — it keeps the researcher in control of each wave.
- Separate passes mean separate MMT schedules. Applying the template to Cohort A on Monday and Cohort B on Wednesday gives them different random prompt schedules. Apply all participants in a single batch if your design requires shared EMA timing across cohorts; separate applications are fine if between-cohort variation is acceptable.
- Old templates still produce correct offsets. The offset calculation anchors to the Sunday of the week the template starts in, not to today relative to the template date. Even a template built months ago correctly lands on the coming Sunday when you apply it — you don’t need to update its dates periodically.